


The purpose of this article is to provide a guide for software developers looking to get started with Express.js to build application programming interfaces (APIs) with Create, Read, Update, Delete (CRUD) operations.
So let us build a CRUD API with Express.js and MongoDB.
Prerequisite
Knowledge of JavaScript and Node.js.
Basic knowledge of MongoDB ( I'll be using this as my database for the express.js project ).
Basic knowledge of MVC architecture ( I'll explain everything along the way ).
Getting Started with Express.js
Express.js is a fast and minimalistic web application framework for Node.js, a JavaScript runtime environment that is used to run server-side applications. Express is designed to simplify the process of building scalable web applications and APIs.
Features of Express.js
Express.js has some of the coolest features that make it easier for developers to handle various aspects of web development like routing, managing middleware, handling HTTP requests, API integration and more.
Let's discuss the above features before diving into the project.
Routing. Express allows you to define endpoints for different URLs and HTTP methods ( GET, POST, PUT, DELETE). The routes determine how the application responds to client requests.
Middlewares. These are functions that help with handling the request-response cycle. Middleware functions are executed in sequence and help with enabling tasks throughout the application.
HTTP Request and Response Handling. When a client sends requests to your server, the server responds with data. When a request is sent, express routes that request to the appropriate route handler based on the URL and HTTP method. After the request goes through, a response is generated and sent to the client.
API integration. Express simplifies the process of handling API endpoints and requests.
Getting into Express.
Assuming you have already installed node.js, make a new folder on your computer and open it using a text editor like VS Code.
You can also check the node version using the command: node -v
The next step is to initialize an empty package.json to install and manage our dependencies: npm init
That creates an empty package.json file at the root of your project which we will edit slightly.
Next, install express using the command npm install express and check that it is installed in the package.json under dependencies.
Next, create a server.js file at the root and inside the file let's create a server using express using the code block below.
Some of the things I like to do is put all my environment variables in a .env file and load them using process.env.VariableName, in my case I'm loading the PORT value. Any variable that you'd want to keep a secret goes into the env file. These variables include your MongoDB connection string, API keys etc.
You'll need to add dotenv library using npm install dotenv and create a .env file at the root.
const express = require("express");
const app = express();
require("dotenv").config();
const PORT = process.env.PORT || 3500;
app.listen(PORT, () => {
  console.log(`server listening on ${PORT}`);
});
To start the server.js, I will be installing a new dependency called nodemon to automatically restart the application in case of any changes.
Run the command: npm install nodemon --save-dev
We'll install it as a dev dependency as it is just needed for locally running the project and not functioning the project.
Next, let's edit the package.json to:
{
  "name": "notes-crud-api",
  "version": "1.0.0",
  "description": "",
  "main": "index.js",
  "scripts": {
    "test": "echo \"Error: no test specified\" && exit 1",
    "start": " node server.js ",
    "dev": "nodemon server.js"
  },
  "author": "",
  "license": "ISC",
  "dependencies": {
    "dotenv": "^16.3.1",
    "express": "^4.18.2"
  },
  "devDependencies": {
    "nodemon": "^3.0.1"
  }
}
To run our server.js file just type npm run dev on the terminal and you will see the console message and the port number.
AND VOILA YOU HAVE CREATED A SERVER WITH EXPRESS!!.
Next, we'll set up the endpoints we will be hitting as:
| CRUD ACTIONS | HTTP Method | Endpoints |
| Get all notes | GET | /api/notes |
| Get note | GET | /api/notes/:id |
| Create note | POST | /api/notes |
| Update note | PUT | /api/notes/:id |
| Delete note | DELETE | /api/notes/:id |
Onto exciting things, let's set up our HTTP methods. I will be using ThunderClient VS Code extension to test the endpoints locally but you can also use Postman.
Here is the setup of the routes in the server.js file according to the wireframe above.
-Some key things to look out for: When getting a specific note we use the id. The same goes for updating and deleting.
const express = require("express");
const app = express();
require("dotenv").config();
const PORT = process.env.PORT;

//Routes
app.get("/api/notes", (req, res) => {
  res.status(200).json({ message: "here are all the notes" });
});
app.get("/api/notes/:id", (req, res) => {
  res.status(200).json({ message: `get note for ${req.params.id}` });
});
app.post("/api/notes", (req, res) => {
  res.status(200).json({ message: "Create a note" });
});
app.put("/api/notes/:id", (req, res) => {
  res.status(200).json({ message: `update note ${req.params.id}` });
});
app.delete("/api/notes/:id", (req, res) => {
  res.status(200).json({ message: `delete note ${req.params.id}` });
});
//
app.listen(PORT, () => {
  console.log(`server listening on ${PORT}`);
});
You can run your application and test out the routes using Thunderclient or Postman to make sure they return a status 200 along with the message.
To clean up the code above, we can extract the routes into their folder so as not to configure all routes in the server.js.
This means we are going to explore routing in express.js.
Routing in express is the process of directing incoming web requests to the right code in your application based on the URL and HTTP method.
We will make use of express.Router() which can be explained as: Imagine having a book that is grouped into folders that need to be tied together to make a story. Think of express.Router() as creating different folders(routes) that hold a set of related pages(routes and handlers). This way your code is organized and everything is clear.
With all that said, create a route folder on the root then add a notesRoutes.js file inside. We can now extract the routes that we created in the server.js into the notesRoutes.js as follows:
const express = require("express");
const router = express.Router();

router.route("/").get((req, res) => {
  res.status(200).json({ message: "here are all the notes" });
});
router.route("/:id").get((req, res) => {
  res.status(200).json({ message: `get note for ${req.params.id}` });
});
router.route("/").post((req, res) => {
  res.status(200).json({ message: "Create a note" });
});
router.route("/:id").put((req, res) => {
  res.status(200).json({ message: `update note ${req.params.id}` });
});
router.route("/:id").delete((req, res) => {
  res.status(200).json({ message: `delete note ${req.params.id}` });
});

module.exports = router;
From the above, you have extracted the routes into a routes folder and cleaned up the server.js. By exporting the module, we make it accessible in other parts of the file or application.
The server.js file will then look like this:
const express = require("express");
const app = express();
require("dotenv").config();
const PORT = process.env.PORT;
//middleware
app.use("/api/notes", require("./routes/notesRoutes"));

app.listen(PORT, () => {
  console.log(`server listening on ${PORT}`);
});
We are using app.use in the server.js which is a helper to help manage the request and response cycle in our code. And that is what is called middleware. It handles all the HTTP methods defined in our notesRoutes.js file.
So in the above code block, we are telling the server.js to use the defined routes and providing the file path.
After separating your code, you can test the endpoints to make sure that everything is working as before.
The next step is the most interesting as we are separating the code using the Model, View and Controller (MVC) architecture. Since we are just building the backend, we'll implement the model and controller for the API.
Let's see how you can implement MVC for such a project.
MVC
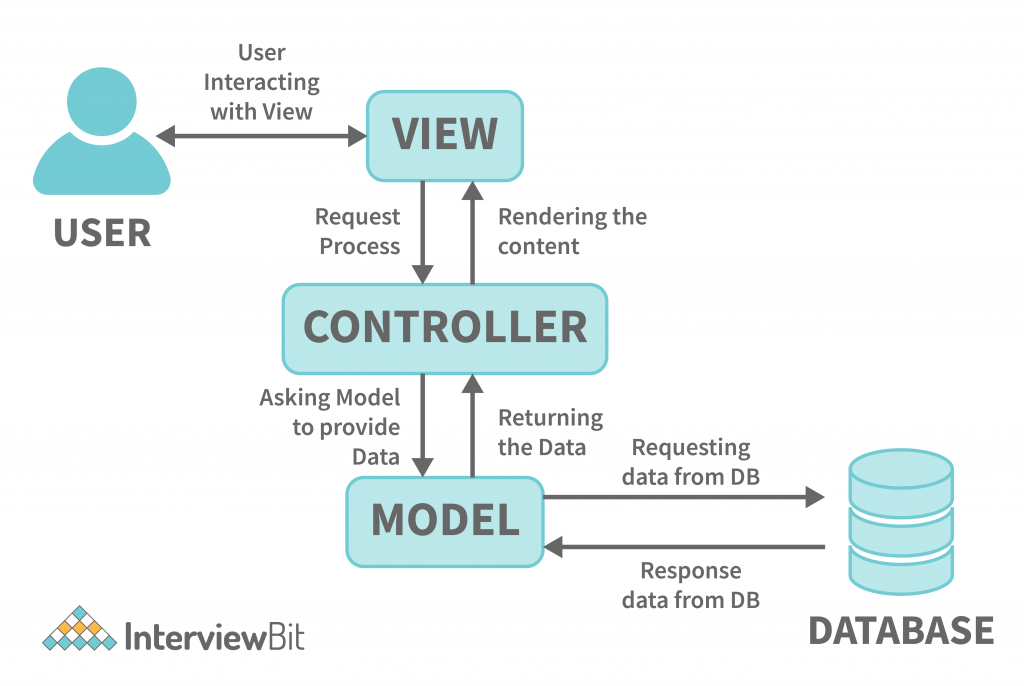
MVC is an architectural pattern used in software development and it separates the application into three interconnected parts: Model, View and Controller. Each component has a role and contributes to the overall structure and functionality of the application.
1. Model
Responsible for maintaining the application's data. Models can be implemented through the use of MongoDB, MySQL, Oracle etc. The model is connected to the database. Also, this is where you define all your schemas eg using Mongoose in MongoDB. Adding and retrieving data is done in the model. The model responds to controller requests by moving back and forth retrieving data needed.
2. View
Does data representation by rendering what the client sees on a browser. It generates the User Interface for the user. Views can contain templating engines such as EJS, PUG, and Handlebars. Views are created by the data which is collected by the model component. The data is taken through the controller.
3. Controller
The controller dictates how the application behaves and what data is sent to the model and view. It is the connection between the view and the model. It takes data from the model, processes it and then takes all the information to the view and explains how to represent it to the user.
In a web application, a Controller could manage URL routing, handle HTTP requests, and orchestrate interactions between the Model and the View. It ensures that user actions trigger the appropriate responses and updates.
Take a look at the flowchart summary:
Advantages of MVC include:
Separation of concerns.
Separates functionality into logical components.
The components are reusable throughout the application you just have to specify the path.
Easy to maintain.
Helps with testing individual components.
Disadvantages
- Complexity is high.
Now that we have an overview of the MVC design pattern, we will implement the same for our project.
Create a controllers folder at the root and add notesController.js file into it.
Inside the notesController.js we will be creating different controller functions that handle the HTTP requests.
The file will look like this:
//get all notes
//@route GET/api/notes
const getNotes = (req, res) => {
  res.status(200).json({ message: "here are all the notes" });
};

//get a notes
//@route GET/api/notes/:id
const getNote = (req, res) => {
  res.status(200).json({ message: `get note for ${req.params.id}` });
};
//create or post a notes
//@route POST/api/notes
const createNote = (req, res) => {
  res.status(200).json({ message: "Create a note" });
};
//update a note
//@route PUT/api/notes/:id
const updateNote = (req, res) => {
  res.status(200).json({ message: `update note ${req.params.id}` });
};

//delete a note
//@route DELETE/api/notes/:id
const deleteNote = (req, res) => {
  res.status(200).json({ message: `delete note ${req.params.id}` });
};

module.exports = { getNotes, getNote, createNote, updateNote, deleteNote };
The getNotes controller function is responsible for handling a getnotes action. When triggered it sends a response with a status 200 (OK) and a JSON message "here are all the notes"
The same goes for all the other HTTP methods.
Do not forget to export all your controller functions so they can be available for use in other parts of the applications.
Looking back to our routes folder and into the notesRoutes.js file, here is how we maintain the flow. Since we have separated our HTTP methods into the controller, we need to make use of the functions in the notesRoutes.js as follows:
const express = require("express");
const router = express.Router();
const notesController = require("../controllers/notesController");

router.route("/").get(notesController.getNotes);
router.route("/:id").get(notesController.getNote);
router.route("/").post(notesController.createNote);
router.route("/:id").put(notesController.updateNote);
router.route("/:id").delete(notesController.deleteNote);

module.exports = router;
In the above, we have attached the route handlers to the controller functions.
Inside the .get() method, the notesController.getNotes function is attached as the route handler. This means that when the defined route is accessed via a GET request, the getNotes function from the notesController module will be invoked to handle the request.
The same applies to the rest of the HTTP methods.
You can test your endpoints in Thunderclient to make sure you haven't broken anything.
Also, you can clean up the notesRoutes.js further as we have some common routes just to save on some lines.
The next step is to handle parsing data to the request body when creating a new note.
You realize that if you console.log the req.body in the createNote function in the controller and try to post data using thunderclient you get undefined on the console as shown below using an image.
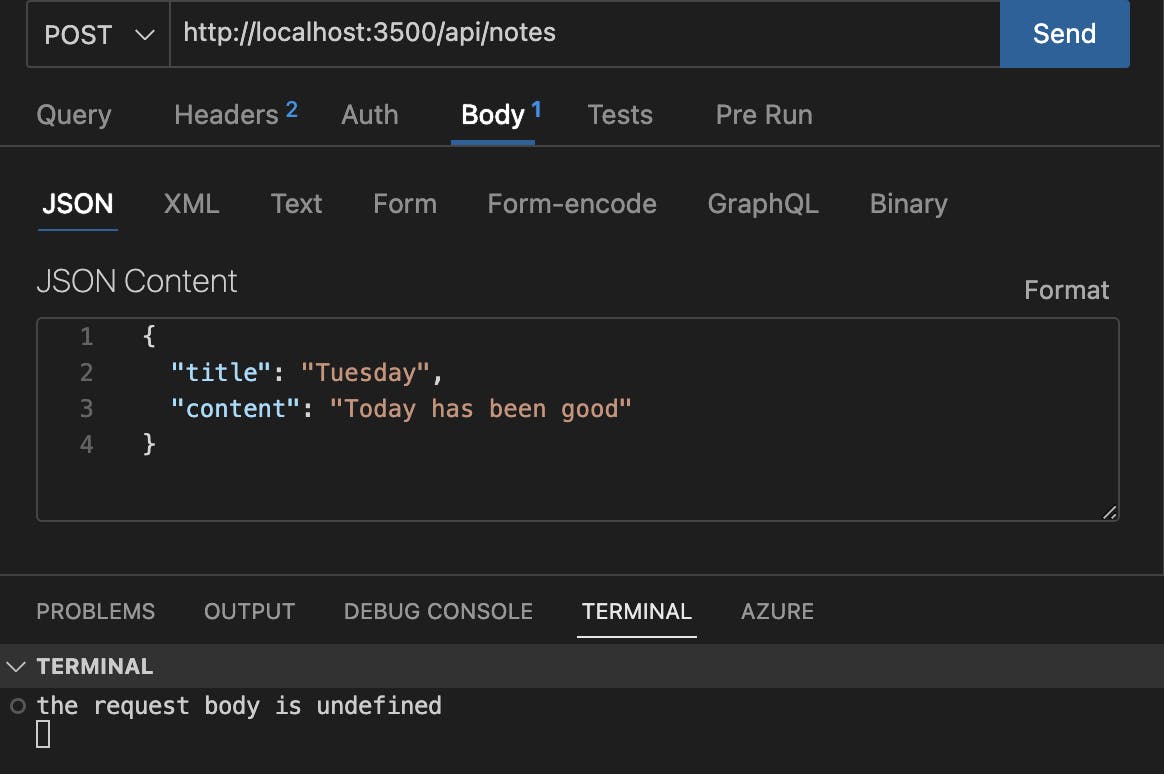
We will make use of a middleware to parse incoming JSON data from requests and populate the req.body with the parsed data.
The middleware we will be using is : app.use(express.json()) and you can add it in server.js just above the route handler middleware. You can try to pass data and check out the console for the title and content.
We also need to handle for when one passes an empty request body ie no title and content. You do this by adding a condition to check for the title and content of the note if there's no content it throws an error.
const createNote = (req, res) => {
    const { title, content } = req.body;
    if (!title || !content) {
      res.status(400);
      throw new Error("all fields are required!");
    }
    console.log(req.body);
  res.status(200).json({ message: "Create a note" });
};
Now that we are done setting up API endpoints, next is to add Create, Read, Update, Delete (CRUD) operations to the API using MongoDB.
MongoDB
MongoDB is a NoSQL database. That means instead of storing data in tables and rows like in relational databases, it stores data as a collection of documents.
For instance, we are collecting data about people(name, age, email), each person's information would be a document and all the documents make up a collection.
This provides a flexible and scalable way to store data.
Moongose
Mongoose is an Object Data Modelling library that provides a high-level abstraction layer on top of MongoDB. It allows developers to specify their data models utilizing schemas.
A schema is a blueprint that defines the structure of a collection in a MongoDB database. It provides all the fields a document in a collection should have along with the data types and any validation requirements.
Here is a step to step guide on how to get started with MongoDB by Traversy Media and some more useful information on mongoose HERE.
After we can then create a database give it a name in my case I'll call my Database notes-backend and a collection name of notes.
Back to our project, install the Mongoose library: npm install mongoose
Next, go back to the MongoDB atlas and grab your connection string and add it to the env file as DB_CONNECTION_STRING = string.
Now to connect our database, create a config folder then add a dbConnection.js file then add the code below.
const mongoose = require("mongoose");

connectDB = async () => {
  try {
    const connect = await mongoose.connect(
      process.env.DB_CONNECTION_STRING
    );
    console.log(
      "Database connected :",
      connect.connection.host,
      connect.connection.name
    );
  } catch (error) {
    console.log(error);
    process.exit(1);
  }
};
module.exports = connectDB;
I have defined an asynchronous function connectDB that uses mongoose.connect() method with the mongoDB connection string obtained from our environment variable to connect to our database.
We then import the connectDB function into the server.js adding the exact file path and then invoking it. You should see the connection message on the console when you start your server.
Next, we create a schema for the notes.
According to the MVC design pattern the model holds our schema.
Create a new folder called model at the root then add notesSchema.js file.
The simplest way to design a schema is to consider the following:
Get a clear understanding of your application's data requirements by this you'll know what to store.
Identify the fields needed for the application. In our case, we could just make use of title and content fields.
Data types and validation. Choose appropriate data types for each field (eg string, number, date). In our case, both will be strings. Define validation rules for the fields for data consistency and integrity (eg required, unique).
const mongoose = require("mongoose");

const notesSchema = mongoose.Schema(
  {
    title: {
      type: String,
      required: [true, "please add title"],
    },
    content: {
      type: String,
      required: [true, "please add your notes"],
    },
  },
  {
    timestamps: true,
  }
);
module.exports = mongoose.model("notes", notesSchema);
The schema above specifies two required fields: "title" and "content," which hold the note's title and content. With the option timestamps: true, it automatically tracks the creation and update times of the document.
Now that we have established a MongoDB connection and created a schema we can then add crud operations to the APIs and check for the data in our database.
In the notesController.js, make use of the model to interact with the database.
const Note = require("../model/notesModel");

//get all notes
//@route GET/api/notes

const getNotes = async (req, res) => {
  try {
    const notes = await Note.find();
    res.status(200).json(notes);
  } catch (error) {
    res.status(500).json({ error: "an error occurred" });
  }
};

//get a notes
//@route GET/api/notes/:id
const getNote = async (req, res) => {
  try {
    const note = await Note.findById(req.params.id);
    if (!note) {
      res.status(404).json({ error: "note not found" });
    }
    res.status(200).json(note);
  } catch (error) {
    res.status(500).json({ error: "an error occurred" });
  }
};
//create or post a notes
//@route POST/api/notes

const createNote = async (req, res) => {
  try {
    const { title, content } = req.body;
    if (!title || !content) {
      res.status(400).json({ error: "all fields are required" });
    }
    const note = await Note.create({ title, content });
    res.status(200).json(note);
  } catch (error) {
    res.status(500).json({ error: "an error occurred" });
  }
};
//update a note
//@route PUT/api/notes/:id
const updateNote = async (req, res) => {
  try {
    const note = await Note.findByIdAndUpdate(req.params.id, req.body, {
      new: true,
    });
    if (!note) {
      res.status(404).json({ error: "note not found" });
    }
    res.status(200).json(note);
  } catch (error) {
    res.status(500).json({ error: "an error occurred" });
  }
};

//delete a note
//@route DELETE/api/notes/:id
const deleteNote = async (req, res) => {
  try {
    const note = await Note.findByIdAndDelete(req.params.id);
    if (!note) {
      res.status(404).json({ error: "note not found" });
    }
    res.status(200).json(note);
  } catch (error) {
    res.status(500).json({ error: "an error occurred" });
  }
};

module.exports = { getNotes, getNote, createNote, updateNote, deleteNote };
CREATE
In the above code block, we are checking for the presence of both title and content fields then proceeding to use the Mongoose create method to add a new note document in the MongoDB collection using the Note model.
READ
Makes use of the Mongoose find method to asynchronously retrieve all notes from the MongoDB collection using the Note model. To find a specific note, we use findById method based on the id parameter from the request.
UPDATE
Makes use of the Mongoose findByIdAndUpdate method to find an note by its id and update it using the provided request body. The { new: true } option returns the updated note.
DELETE
Makes use of findByIdAndDelete Mongoose method to find a note by its id and delete it from the collection.
Add some notes to the database using Thunderclient and check for the notes in the database. Also, perform crud operations on the APIs and test all endpoints.
Here's the link to the GitHub repository for the backend code.
Feel free to add user authentication.